Chat app - Part 1
Date: 12/30/2019
The very beginning...
So it's the end of 2019, and I just finished a Computer Communications Systems course. I learned all these new protocols and schemes (thanks Prof Soryal). I learned how to what a ARP table was, TCP vs UDP, three way handshakes, IPv4, IPv6 and all that. Hell, I even got together with an awesome group and we created a blockchain from scratch.
So then I figured... why not apply that knowledge and build a little chat app? Those good old days with AIM and MSN messenger... why don't I try and do something like that in Python? And so, a new project idea was born. But... before I started on this project, I had to review a little. I had to choose the right protocols to use (whenever I was given a choice) so I guess let's talk about that first.
Network Schema
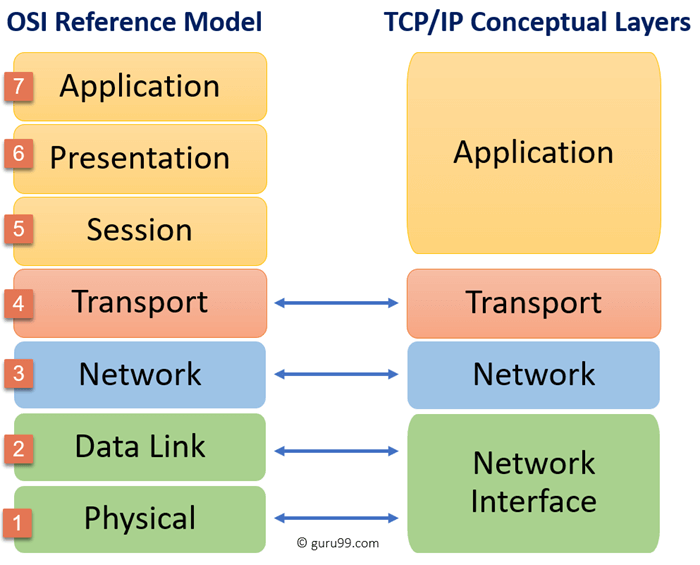
The OSI 7-layers was pretty much the bread and butter of the computer communication systems course (along with queueing theory). So of course, I still remember them by heart:
- Physical
- Data Link
- Network
- Transport
- Session
- Presentation
- Application
Let's do a quick recap before we keep going, I think it'd be best this way.
Physical - The physical parts of any communication system from antenna to the medium (wire, air, water, etc).
Data Link - This is the establishment of a connection
Network - Finding the route between one network to another
Transport - Literally the transportation of data through the network
Session - this is where the sockets reside, this is when our process receives/sends user data
Presentation - Parsing the header to give the user a pleasant (or unpleasant in my case) way to interact with the data
Application - This is the end of 7th and final layer, where the user can interact by sending/receiving data.
So we see here that using the OSI 7-layer model is very, and i mean very specific. I mean, if you look at L5-L7, you can see that you could probably wrap that up into one layer instead of seperating it. Well turns out, theres another way to model a computer communication pipeline.
I remember in the very beginning of my computer communications systems class (I'll just call by it's class code: EE 460), that Prof. Soryal introduced us
to the 7-layer model, then prompty said something like ... "well, actually in practice, we could reduce this to 4-5 layers." and that was the end of that
conversation. Turns out, this model is called the TCP/IP Model.
There it is on the right, with this model there are only 4 main layers:
- Network Interface
- Network
- Transport
- Application

OSI Model vs TCP/IP Model
Time for some Python !
Finally! Now that I've learned the TCP/IP Model and reveiwed some networking, it's finally time to code! Woo! Alright, here we go~!
In order to make this chat app, I need two parts:
- Server
- Client
The Server
Alright so let's create the server first. For the chat app, I'll only be using the libraries included with python. In this case they are
Socket and Threading. Socket will be used to create the session. Threading will allow different
parts of this program to run in parallel. It'll make it easier to design and execute things later on. However, let's focus on the socket first.
Before I create the socket, I'll just define some globals first.
I'll be needing a couple things later: Host address (Host IP and Port) and the buffer size. So here it is:
HOST = ''PORT = 33000BUFSIZ = 1024
socket! So to create the socket we need two things: the IP protocol type and the transport type.
I'm just going to go with IPv4 and TCP. In the socket, we define these two parameters as: AF_INET and SOCK_STREAM, respectively.
So we need two lines of code to create our
Socket and bind it to our host. We might as well create the dictionaries to store our client names and addresses here as well
# Creating our socket with IPv4 and TCP. Then bind it to our host address and port
SERVER = socket(AF_INET, SOCK_STREAM)SERVER.bind((HOST,PORT))
												# Creating dictionaries to store client names and addresses

												clients = {}

												client_addresses = {}
Broadcast Function
Next, let's create a broadcast function. All this function will do is take a message, then broadcast it to all connected clients.
It's not too special. The format will be something like: client name: "their message". The client's name and their message should be seperated by
a colon. This function also needs to handle any system messages.
So the idea is to take some message in as the input, and then iterate through our clients dictionary and send the message to them one by one.
Let's code it.
												# define the function broadcast. The Sender's default will be 'SYSTEM'.

												def broadcast (msg, sender='SYSTEM'):

												    broadcast_msg = str(sender) + ': ' +str(msg)

												    for client in clients:

												        client.send(bytes(broadcast_msg, "utf-8"))
